PETG Print Settings Guide: Temperature, Speed, and Retraction Explained
Master PETG 3D printing with our detailed guide to optimal print settings. Learn the ideal temperature, speed, and retraction values to achieve strong, high-quality prints consistently.
Artopia Collections Blog Team15 August 202612 min read

PETG Print Settings Guide: Your Golden Ticket to Stronger Prints (Without the Headache)
Alright, my fellow print-heads, let's be real. If you've been playing around with PLA for a while, basking in its easy-going glory, then tried to dip your toes into the PETG pool, you probably felt like you'd been thrown into the deep end without a floatie. Stringing? Blobs? Poor layer adhesion making your beautiful print crumble like a cheap papad? Yeah, I've been there. My first PETG prints were an absolute disaster, honestly. I almost gave up on the stuff entirely, convinced it was just some mythical beast only experienced pros could tame. But trust me, PETG, or Polyethylene Terephthalate Glycol for the science nerds among us (though let's be real, who actually says the full name?), is an absolute game-changer once you crack its code. Itâs that perfect bridge between easy-to-print PLA and the hardcore stuff like ABS, offering incredible strength, flexibility, and temperature resistance that PLA just canât touch. And here in India, where the summers can melt your soul (and your PLA prints!), PETG becomes not just an option, but often a necessity for functional parts. My little venture, Artopia Collections, relies heavily on PETG for a lot of our functional prototypes and custom parts for clients who need something tougher than basic plastic. Think jigs, fixtures, parts for outdoor use, or even sturdy enclosures for electronics that might get a bit warm. PLA would just deform. ABS is great too, but the fumes and warping are a whole different ballgame. PETG sits right in that sweet spot. So, after countless hours of tinkering, failed prints, successful prints, and enough stringing to knit a small sweater, Iâve finally dialled in some settings that consistently work for me across a range of printers, from my trusty Ender 3 Pro to the more precise Prusa MK3S+. I want to share my hard-won wisdom, because nobody deserves to suffer through PETG purgatory.The Holy Trinity: Temperature, Speed, and Retraction
The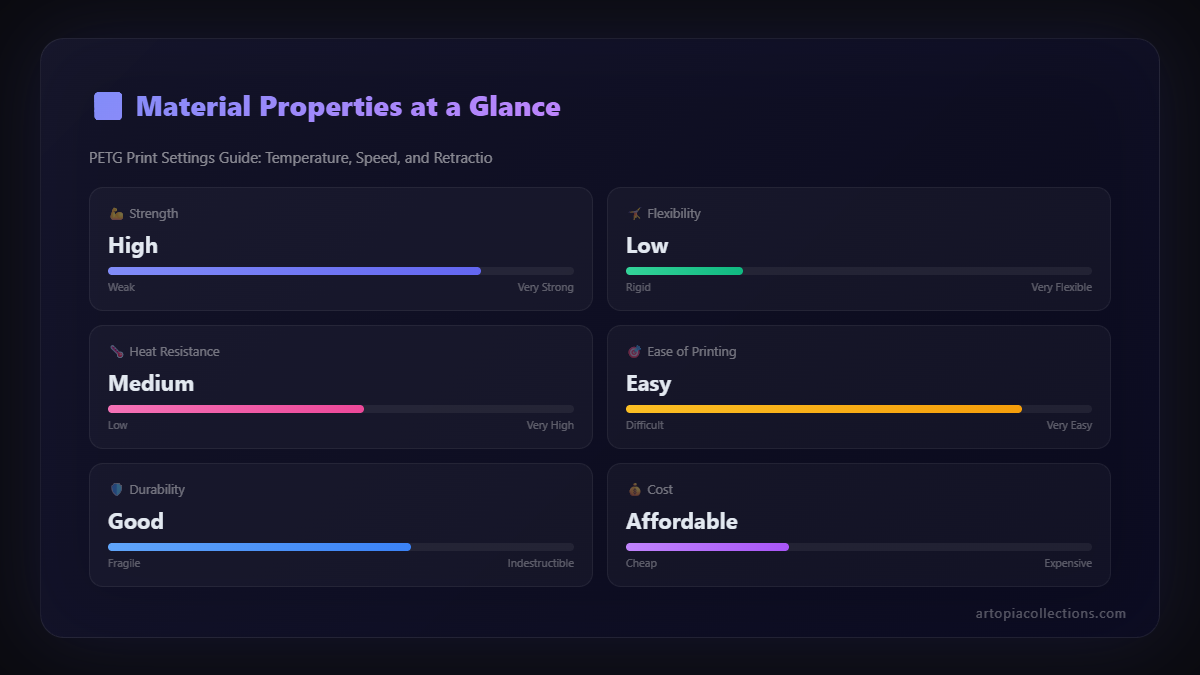 se three settings are the absolute core of a successful PETG print. Get them wrong, and you're in for a world of pain. Get them right, and you'll be cranking out robust, beautiful parts that can actually withstand a bit of rough handling.
1. Temperature: The Goldilocks Zone for PETG
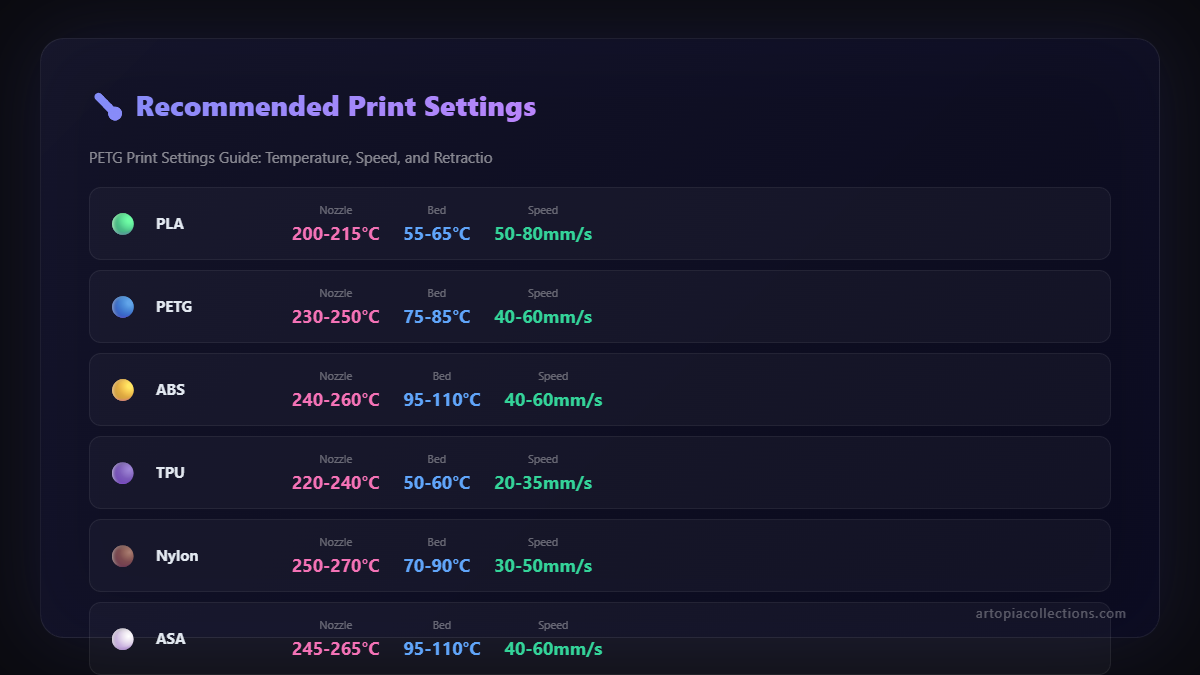
This is probably the most crucial setting, and itâs where most people either undercook or overcook their PETG. Too cold, and your layers won't bond properly; too hot, and you're going to get stringing that would make a spider proud. * Nozzle Temperature: For most PETG filaments available in India â and I've tried a bunch, from e-Sun to PolyMaker, even some of the local brands like Protomaxx â I find that a nozzle temp between **230°C and 245°C** works best. Start right in the middle, around 235°C, and then print a temperature tower. Seriously, print one! Itâs the best â¹50 worth of filament youâll ever spend. For my Creality machines (like the Ender 3 V2 I use for a lot of my everyday stuff), I often lean towards the higher end, say 240°C-245°C, especially if I'm pushing print speed a bit. The hotend on those sometimes struggles to keep up with faster extrusion rates, so a little extra heat helps the plastic flow smoothly. But with my Prusa, I can usually stick to 235°C-240°C without issues. The thing is, every filament spool, even from the same brand, can have slightly different properties, so don't just blindly copy-paste. Experiment! A common mistake I see (and made myself) is trying to print PETG at PLA temperatures, maybe just a little higher. Nope, doesn't work. PETG needs that extra heat to properly melt and bond. If your prints are brittle, snapping along layer lines, your nozzle temperature is likely too low. Conversely, if you're battling extreme stringing, dropping the temperature by 5°C increments can often help â but don't go too low or you'll be back to weak layers. * Bed Temperature: Now, bed adhesion for PETG can be a bit tricky. It loves to stick, sometimes *too* much, which can lead to tearing off bits of your build surface (ask me how I know, RIP my first PEI sheet!). For a good first layer and to prevent warping, I usually aim for a bed temperature between **70°C and 85°C**. On my textured PEI sheets, I generally run it at 75°C-80°C. For smooth PEI, I usually go a tiny bit lower, 70°C, and ALWAYS use a release agent. A thin layer of glue stick (the cheap Pritt sticks work wonders, cost you like â¹20-â¹30 a piece!) or even a mist of hairspray (LâOréal Elnett, believe it or not, is a favourite among many!), creates a perfect barrier. This helps the print stick beautifully while hot, but crucially, allows it to release cleanly once the bed cools down. Without a release agent on smooth PEI, you're practically welding your print to the bed. Trust me, itâs not fun trying to pry off a print and realizing youâve taken a chunk out of your expensive build plate. And you can find good quality glue sticks pretty easily online, like these: Amazon.in Glue Sticks.2. Speed: Patience is a Virtue (Especially with PETG)
Unlike PLA which you can often ram through at ludicrous speeds, PETG generally prefers a more measured pace. Trying to print PETG too fast is a recipe for disaster: poor layer adhesion, increased stringing, and a generally uglier print. * Overall Print Speed: For general printing, I usually stick to **40-60 mm/s**. If Iâm doing something critical where aesthetics and strength are paramount, I'll often slow it down to 30-40 mm/s. For my business, where reliability is key, I usually target 50 mm/s for most PETG prints. That's a good balance of speed and quality. * First Layer Speed: This is non-negotiable for any material, but especially so for PETG. A slow and steady first layer ensures maximum adhesion and reduces the chance of warping. I set my first layer speed to a crawl, usually **15-20 mm/s**. Give that first layer every chance to stick perfectly. * Outer Perimeter Speed: If you want nice, clean walls, slow down your outer perimeters. I typically run them at **20-30 mm/s**. This gives the PETG enough time to lay down smoothly and cool just enough before the next layer. Faster perimeters will often lead to more prominent layer lines and potentially less defined features. * Infill Speed: You can usually get away with pushing your infill a bit faster, say **60-80 mm/s**, because aesthetics aren't as important here. But don't go crazy. If you hear your extruder skipping or the quality of your infill looks like spaghetti, slow it down. It's usually a sign your hotend can't keep up with the melt rate required. Remember, PETG is a bit gooey, a bit sticky when molten. Giving it time to properly extrude and cool slightly before the next layer makes a huge difference.3. Retraction: The Stringing Slayer
This is it, folks. This is the big one for PETG. If you're struggling with cobwebs all over your prints, retraction is where you need to focus your attention. PETG loves to string because of its inherent stickiness when hot. It just wants to follow the nozzle everywhere! * Retraction Distance: This is highly dependent on your printer setup. For **Bowden setups** (like most Creality Enders), you'll need a longer retraction distance. Start with **5-7 mm** and tune from there. Increments of 0.5 mm are a good way to go. On my Ender 3 Pro, Iâve often found sweet spots around 6.5 mm. For **Direct Drive systems** (like on a Prusa MK3S+ or if you've upgraded your Ender), youâll need much shorter distances. Start with **0.8-2 mm**. On my Prusa, I typically use 1.5 mm, sometimes even 1.2 mm depending on the filament. Too little retraction, and you get stringing. Too much, and you risk clogging your nozzle, especially with a Bowden setup, as it can pull molten plastic up into the cold end. Print a retraction tower! It's another small print that saves a huge amount of headache. * Retraction Speed: This is just as important as distance. Too slow, and the molten plastic has more time to ooze and string as the nozzle moves. Too fast, and you can strip the filament or cause excessive wear on your extruder gear, especially with a direct drive system. I generally aim for a retraction speed of **40-60 mm/s**. For Bowden setups, you might even push it a bit higher, say 70 mm/s, if stringing is persistent, but keep an eye on your extruder. For direct drive, I usually stick to 40-50 mm/s. * Combing Mode: This is a lifesaver for PETG. Combing makes your nozzle travel within the printed part's boundaries when moving between print areas, rather than retracting and travelling directly through the air. This minimizes the number of retractions and thus reduces stringing significantly. I pretty much always have it enabled in my slicer (Cura or PrusaSlicer). Just remember to set it to "Not in Skin" or "Within Infill" so it doesn't leave marks on your outer surfaces. * Z-Hop: While Z-hop can prevent the nozzle from scraping over the already printed part, which is good, it can sometimes exacerbate stringing with PETG because it lifts the nozzle *away* from the print, giving gravity a chance to let that gooey plastic ooze. I usually keep Z-hop disabled for PETG unless I'm having serious issues with nozzle collision. If I *do* enable it, I keep the Z-hop distance very small, maybe 0.2-0.4 mm.Other Crucial PETG Wisdom
Beyond the big three, a few other things can make or break your PETG experience. * Cooling: Less is Often More This might sound counter-intuitive, but PETG actually prefers less cooling compared to PLA. Excessive cooling can lead to delamination (poor layer adhesion) and make the plastic more brittle. For the first few layers (say, 3-5 layers), I usually have my part cooling fan completely off. After that, I typically set it to **20-50%**. For bridging, you might need to ramp it up to 70-100% briefly, but for general printing, keep it low. This allows the hot layers to properly fuse with the layers below. * Dry Your Filament! Seriously! PETG is hygroscopic, meaning it loves to absorb moisture from the air. And India, especially during the monsoon, is a humid place! Wet PETG filament will give you terrible prints: popping and crackling sounds during extrusion, weak layers, terrible surface finish, and *even more* stringing. Itâs a nightmare. Iâve invested in a filament dryer (something like this Creality Filament Dryer on Amazon.in is a lifesaver, usually around â¹5,000-â¹7,000), and honestly, itâs one of the best tools I have in my workshop. If you don't have one, pop your spool in your oven at 60°C for 4-6 hours (make sure your oven can maintain that low temp accurately) or even use a food dehydrator. Trust me, dry PETG prints like a dream. * Enclosure? Yes, Please! While not strictly necessary like with ABS, an enclosure really helps with PETG, especially for larger prints or if your print area is drafty. It helps maintain a consistent ambient temperature around the print, which reduces warping and improves layer adhesion. I've got a simple IKEA Lack table enclosure for one of my Enders, and it makes a noticeable difference, especially for those taller parts. * First Layer Calibration: Always, Always, Always! You cannot expect good PETG prints if your first layer isn't perfect. Get your Z-offset dialled in. You want a good "squish" â not so much that it's creating ridges, but enough that the line is flattened and firmly adhered to the bed. If it's too high, it won't stick; too low, and itâll scrape and potentially clog. This is universal for all filaments, but critical for PETG because it just doesn't like being rushed or messed with on that first layer.Troubleshooting Common PETG Woes
* Excessive Stringing: Re-evaluate retraction distance and speed. Lower nozzle temperature by 5°C. Ensure filament is dry. Enable combing.
* Poor Layer Adhesion/Brittle Prints: Increase nozzle temperature by 5°C. Decrease print speed. Lower cooling fan speed.
* Warping: Increase bed temperature. Use an enclosure. Ensure first layer is perfect. Use bed adhesion aids.
* Blobs/Zits: Adjust retraction, especially retraction extra prime amount if your slicer has it. Ensure your "wipe" setting (if available) is enabled. Sometimes a tiny bit of "coasting" can help too.
Excessive Stringing: Re-evaluate retraction distance and speed. Lower nozzle temperature by 5°C. Ensure filament is dry. Enable combing.
* Poor Layer Adhesion/Brittle Prints: Increase nozzle temperature by 5°C. Decrease print speed. Lower cooling fan speed.
* Warping: Increase bed temperature. Use an enclosure. Ensure first layer is perfect. Use bed adhesion aids.
* Blobs/Zits: Adjust retraction, especially retraction extra prime amount if your slicer has it. Ensure your "wipe" setting (if available) is enabled. Sometimes a tiny bit of "coasting" can help too.